I have owned a few “toy grade” multi-rotors and I have to say that this is my favorite.
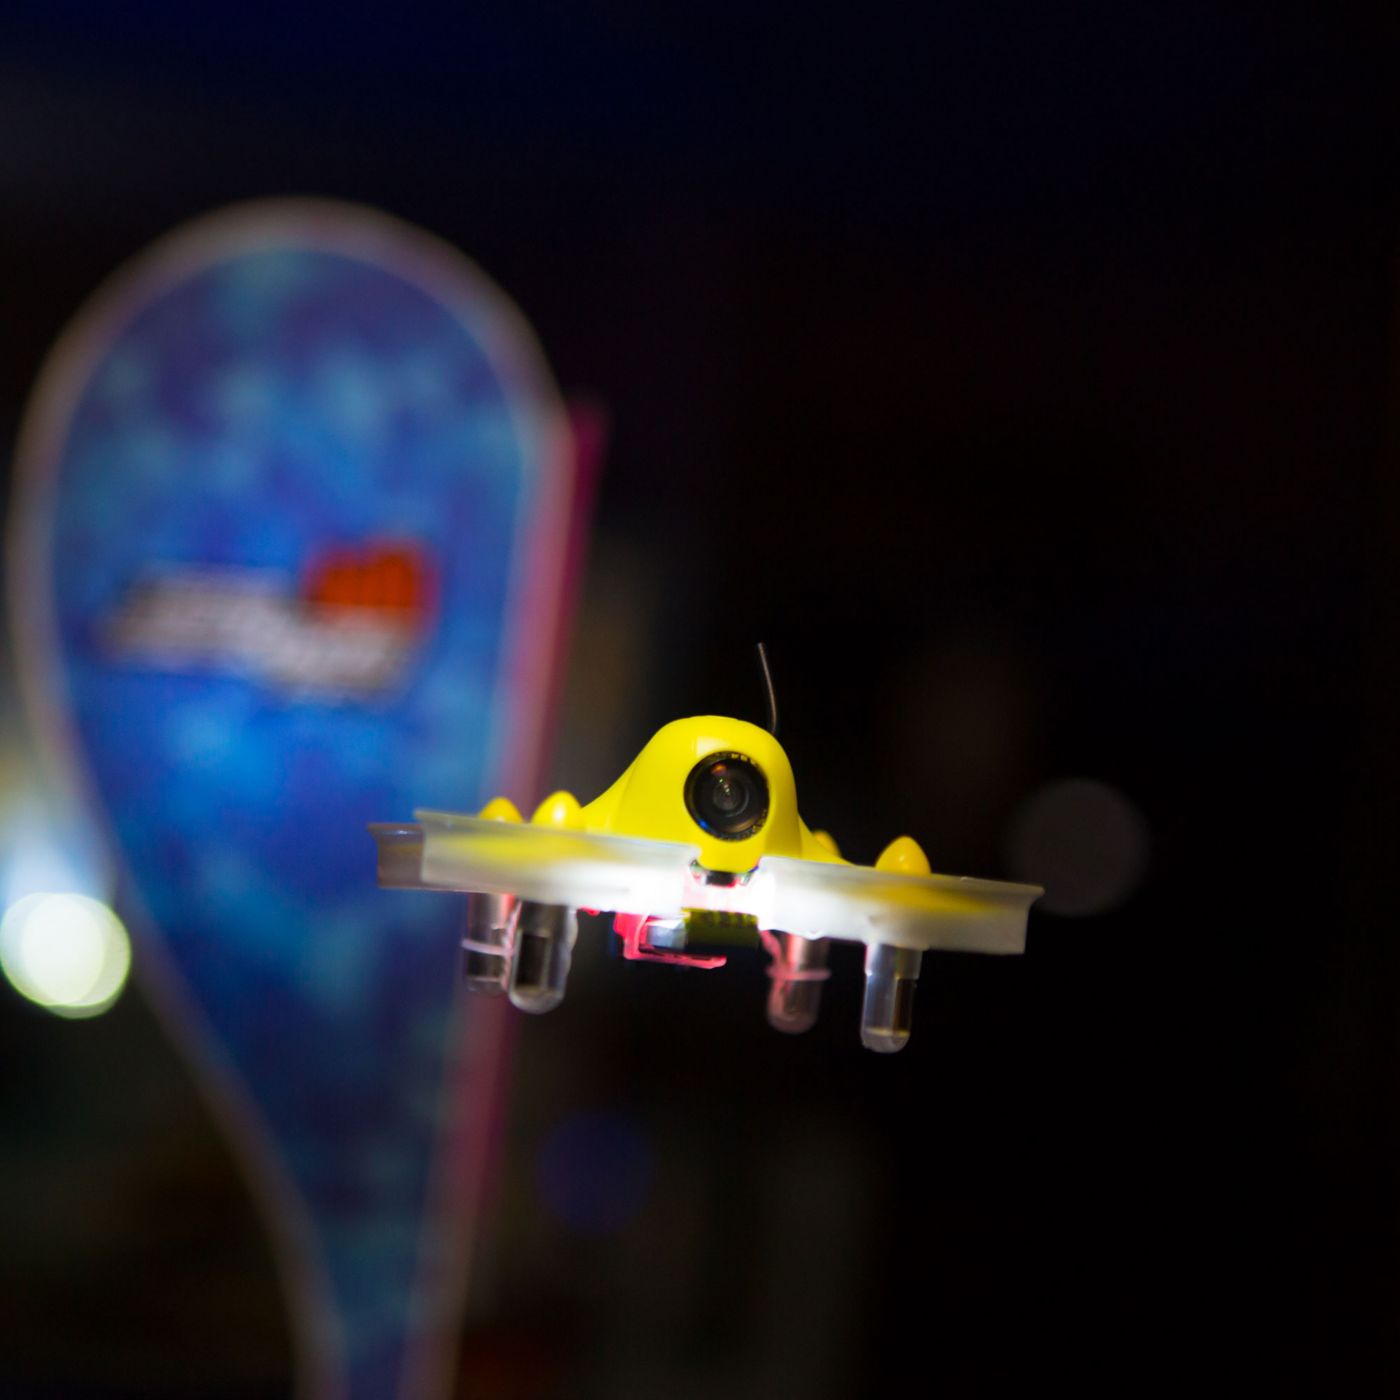
The Inductrix was a toy quadcopter by Blade that was special because it used inducted fan style motors and props which protects the propellers and may give a small power boost. Later, some guys created the Tiny Whoop was created by taking an Inductrix style quad and adding a small camera and transmitter to it so it could be flown FPV.
Seeing the success of the Tiny Whoop, Blade created their own version and named it the Blade Inductrix FPV. It is essentially the Inductrix with a tiny camera and 25mw video transmitter. You have to supply a transmitter and goggles or screen.
With 205mw batteries I bought off Amazon and the great STRIX Power Stix 1s Charging Board I get about 3 minutes a flight, which is ok, but not great.
Fatshark goggles with the Laforge diversity modules, a spiral antenna and a patch antenna, I can fly pretty much anywhere in my house and still get reception good enough to keep it in the air.
The frame is a bit fragile, I recommend buying a couple extra and using a carbon fiber or 3d printed x-frame to add some rigidity and reduce the chance of breaking the motor mounts.
I highly recommend the Blade Inductrix FPV to anyone wanting to fly FPV no matter what kind of flying they want to do!
I have gone all in with the TBS Vendetta, I have put the ZMRs and the Shendrones Krieger away. I am now exclusively flying a pair of Vendettas that I have named McCoy and Hatfield.
The Vendetta is not perfect and it is not indestructible. It is a multirotor for experienced hobbyists and it is not for beginners. I would only recommend it to someone who has built more than 2 difference quads of their own and gone through the experience of tuning, flying, crashing, and breaking.
If you are a beginner I recommend you either buy an ImmersionRC Vortex 250 Pro or take the time to build one of your own from parts you ordered online. Look for locals that will take you under their wing and help you out, sometimes it only takes an experienced pilot seeing your plane fly in person for a minute to tell you exactly what you need to do to fix it.
The Vendetta
You can learn more about the Team Black Sheep Vendetta on the TBS website and there are a lot of great instructional videos that various people have put together. I am not into making videos so I am going to offer my suggestions via this blog post.
I bought the Vendetta because I was no longer having fun building and maintaining quadcopters. I rebuilt my ZMRs 5 times and built a Shendrones Krieger that I was never able to get to fly right, don’t get me wrong, I think the Krieger is one of the best frames on the market and capable of being the most agile and fastest plane out there, I just don’t want to spend any more time rebuilding it or tweaking on it.
The Vendetta comes almost ready to fly, add a receiver, set it up via a couple of pushbuttons and you are ready to fly.
The 3 things you may want to change with the Vendetta as soon as you get are replacing the camera, securing the rear LED cover, and adding a 5V power connector.
Camera
I do not like the ZeroZero camera, I do not like the inability to change its settings without opening it up and clipping wires to it and I do not like the quality of the video it outputs. TBS has updated the camera and I have one of each, an updated one that came with a little orange sticker on it and one without, and I do not like either of them. So I have replaced the camera with a Runcam Swift.
This is my first time using the Swift, but I have used the RunCam Sky many times before, in fact I have 5 of them on various planes and still in the box. The Swift offers very similar performance to the Sky and to the HS1177/PZ402M. It is easy to change the settings and easy to install it in the Vendetta.
The Swift comes with many different methods for mounting it, for the Vendetta you can use the flat back plate and the brackets that are on the ZerZero. But first you should harden the Swift to protect it from crashes, I have been known to hit trees head-on at over 30 miles an hour with my quads so it is important for the FPV camera to be tough.
I use E6000 to and a bamboo skewer to glue down the capacitor and the sensor, doing a Google search can show you a lot of other people recommending this and there are other methods and other adhesives you might want to use.
I do not recommend gluing the circuit board to the housing, issues can arise where the circuit board ends up crooked in the housing, which would cause a fuzzy picture. But I do recommend adding a bit of foam tape to the back plate to hold the circuit board in place while making it easy to remove.
Once the Swift has been toughened and it is time to remove the ZeroZero from the Vendetta and remove the video cables from the 4-pin micro JST connector, I use an X-Acto knife to gently pry up the little piece of plastic holding the cable and then pull it out. A Google search will get you some good videos showing this in action. Then do the same with one of the cables that came with the swift so that you have an empty 3-pin connector.
WARNING: The pin-out for the Swift is different than the ZeroZero.
Now place the wires from the Vendetta into the 3-pin connector being sure to get it right. For the white cable I wrapped it in a bit of electrical tape to keep it from shorting out on something in the plane.
Next take the brackets off of the ZeroZero and put them on the Swift, it is an easy swap and easily fits. Make sure you have an antenna attached to the Vendetta before powering it on, ALWAYS ATTACH AN ANTENNA. In fact I keep an antenna attached at all times to my quads, I only take it off when I have to. Back in the day I burnt out 3 $75 video transmitters by not having an antenna attached.
This is the time to setup the camera, out of the box Wide Dynamic Range is not turned on and that is the most important change to make. I also lower the contrast and sharpness as I feel it make it easier to see small tree branches and other thin objects.
Now time to put the camera into the plane and get ready to fly.
LED Cover
In my opinion the LED cover is the only real design flaw with the Vendetta, it is a piece of plastic glued to the carbon fiber frame, the glue gives out with the smallest bump, even a soft landing can cause it to pop out. I replaced it a couple of times, I really like the looks of having that translucent cover over the LEDs. The LEDs and the circuit board they are on is fragile and needs protection.
The best solution I have found is to drill some holes in the cover and use small zip ties to hold it in place.
Transponder Power
For the Drone Racing Club races I participate in I need a 5v female servo lead to connect a transponder.
The easiest place to get this from is the Servo output on top of the Cube, I was able to solder these wires without taking the Cube apart. Use a nice long cable lead and you can run the cable and connector to the front of the quad and hide it inside the frame behind the camera and front bumper when not in use. I choose to leave the signal cable unconnected for now.
I also think you could use this connector to power a RunCam HD 2 or other action camera, I haven’t tried that yet, but plan to soon.
WARNING: Do not do anything that makes the Cube taller, you will want that space between the top of the Cube and to top of the frame for when the screws holding the front arm sheer off and you need to push the tray up into the frame to get those screws out.
Overall
I really like the Vendetta and plan on it being my exclusive multirotor for a good long while. I like the way it flies and it is easy enough to repair.
Here is a video of me chasing some wings at the Pecan Patch.
My first 250 size quadcopter frame was a ZMR250 which I have been told is a clone of a Blackout 250. The Blackout costs $150 from GetFPV while the ZMR is available for as low as $20 from various sources. I got my first one from Banggood in May 2015, it required some drilling to get the 2204 motors to fit the arms and the SMA VTx to fit through the top plate, but I was pretty happy with it overall.
My initial build included:
Banggood ZMR250 Carbon Fiber Frame
SimonK 20Amp ESCs
SunnySky 2204/2300kv Motors (I think they were knock-offs)
700tvl Sony Board Camera
ImmersionRC 600mw VTx and Spironet Antennas
Naze32 Flight Controller
Home-made Power Distribution Board
I chose black and orange as a color scheme using orange shrink-wrap and propellers. After making a lot of mistakes and burning myself with the soldering iron a dozen or more times I decided to name the plane “Orange Pain”.
Since May I have rebuilt the machine a number of times due to burnt out or broken parts. I have gone through a Naze32, two 600mw VTx, a very expensive board camera, a top plate, three motors, three SN20a ESCs, and a ton of props. I bought an FPVModel ZMR250 and built it as a second plane but have since parted it out.
The current iteration of Orange Pain includes:
A mixture of Carbon Fiber parts from the original Banggood frame and a FPVModel ZMR250 V2 frame
RotorGeek RG20A ESCs
SunnySky 2204/2300kv (I think these are real)
Fatshark 250mw VTx
600tvl Sony Board Camera PZ4020
Naze32 Flight Controller
DYS Power Distribution Board
I think this is a great setup for an intermediate racer or daily basher. I am currently struggling to get the tune on it right and am ready to pay someone else to tune it for me.
After rebuilding the machine a number of times I have learned a few things.
The expensive FPV cameras are not worth it, stick with the $30 Sony PZ4020 or PZ4020M with or without a case.
600mw Video Transmitters are not needed and the extra heat can greatly shorten the life of the unit. A 200mw or even 25mw transmitter may last a long longer and provide a signal that is comparable to the higher-powered transmitters at racing and public park distances.
If you short out a flight controller it is probably ruined. It is good to have an extra on hand.
Spend the extra money on 2 sets of drivers, keep one set in a toolbox at home and carry the other set with you.
I really enjoy my ZMR and recommend them for people getting started who want to build their own. The FPVModel ZMR250 V2 is made of a much higher quality carbon fiber than the Banggood frame, but the cheaper frame is not a bad buy.
Vortex 285 – FPV Race Quad
The Vortex comes with 10 “Pro-Tunes” that were developed by sponsored pilots before its release. I did a bunch of Googling after buying the Vortex to try and find more details about these varoius tunes and found nothing more than a short video from UmmaGawd about the Vortex.
So here are all the tunes as of October 2015. I hope they add some new ones soon that are specific to newer motor and prop combinations, especially DAL props.
In the next couple of weeks I hope to experiment with each of these tunes and see how each performs with the props described and with various DAL props.
Vortex 285 – FPV Race Quad
I have seen a handful of people flying Vortexes around the Atlanta area and after rebuilding my ZMRs like 5 times I decided to give the Immersion Vortex a try.
I bought it from Atlanta Hobby along with both the Carbon Fiber Crash Kit and the Plastic Crash Kit. I also got a cable to allow me to easily connect a Spektrum Satellite receiver without having to make a cable of my own.
I got it home, took it out of the box, connected it to a computer and installed all the updated and such, then was ready to fly. It took me a couple of weeks to have the time and place to fly it, it rained 3 weekends in a row.
Once I finally got to fly the experience was very good. I started out with the Gemfan 5030 props that came with it, Turnigy Nano-tech 3S 1300mah batteries, with a RunCam HD, and used BewweB’s Pro-tune number 2. It flew really well and was a lot of fun. Not what I would call fast or agile, but still fun.
Next up I put a Glacier 4S 1300mah battery on it with DAL 5030 props, it was much faster and a bit more agile. Then I swapped the props out for DAL 5045 Bull-Nose props, but they were too aggressive and drew more amps than I was willing to risk.
Right now I feel like the Vortex’s largest issue is the proprietary 12 amp ESCs. 12 amps is not enough to run 6 inch props on 4S batteries without burning them up very quickly, and right now you cannot get replacement ESCs and without doing something extreme you cannot use larger ESCs.
After 7 flights with a mix of 3S and 4S batteries the ground cable to the FPV camera broke at the connector. I fixed it by cutting up a cable from a RunCam FPV camera and soldering together with the Vortex FPV cable. I also popped the cap off the video transmitter’s antenna, found it and popped it back on, but I plan on gluing it on before my next flight.
Overall I think the Vortex is a decent quad, the trends have changed a lot since its creation and so it has fallen out of favor in comparison to smaller multirotors like the Shendrone’s Tweaker and Krieger, but that does not mean that it is not a good quad. I think it is suitable for fun-flying and even racing at a beginner to intermediate level.
Sorry about the lack of video, the RunCam HD was not at enough of an angle so about all you could see during my flights was the ground. A quick Google search will lead you to many videos of pilots much better than me flying the Vortex.