Press "Enter" to skip to content

Month: April 2020

A Legendary Storage Solution

Legendary Cases
Hobby Lobby Art Cases full of Legendary Marvel cards

Storing around 5000 sleeved cards that you want to be able to easily get at and play with is a bigger problem than I thought it would be. I found some people using the medium size expansion boxes and some cutting and gluing to make some really cool cases, but I don’t want to cut up my boxes. I found a 3d-printed storage solution, but it added a lot of weight to the original box and didn’t come close to holding all of the cards.

Then I found out Broken Token makes inserts for “All Media Artist’s Supply Sketch Box” sold by Hobby Lobby and I already really like Broken Token inserts. With a couple of online coupons, I got 2 cases for half-off and bought the inserts which all arrived in a week or so.

The art cases are well made, the handle is strong, the hinges keep the lid from flopping open, and the locks are sufficient. The insert fits very tightly, even requiring a little bit of sanding, and even without gluing it into the case I don’t feel like it would slide out unintentionally.

I chose to stain both the cases and inserts with a Cherry colored Min-Wax stain, it took two coats to get the color I wanted, actually they are still a little pinker than I would like, but I think they look a lot better than the natural wood they were originally.

Each case weighs around 25 pounds with both the original version and Villains along with all of the expansions up to New Mutants. Pretty soon I will be buying a third case to hold the coming 2020 and 2021 expansions that Upper Deck has planned.
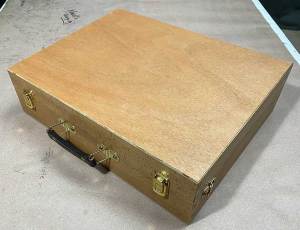
closed art case
Closed art case
Open art case
Open art case with Broken Token Insert

Games

Planck Keyboard Build

Planck Keyboard
Finished Planck Keyboard
After building the macro pad I jumped right into building a Planck. The Planck is a 40% ortholinear keyboard and there are files available on Thingiverse to print your own case and plate to build one.

I used a case from mesohuannny and a plate from furfoxsake. They were both easy to print, but I had to increase the height of the case a bit to accommodate my messy bundle of wires.

For switches I used all of the random switches I had from a couple of switch testers I already owned. My only thought when picking switches was not placing similar switches close together and I did not want clicky switches, but one of them sneaked in.

Wiring Planck Keyboard
Wiring and programming were exactly the same as the macro pad, just more of it. I did not give myself enough extra wire to route it well inside the case which caused the first case I printed not to fit, so I made the case taller and printed it again. That one fit everything but the keyboard only worked intermittently. After a lot of frustration, I realized the reset button on the Arduino was being depressed by the case. A little bit of Dremel tool work later and the keyboard now works great.

I spent an hour or so typing on it and realized that I don’t like ortholinear layout so much. I think it is something I could learn, but then it would be harder to type on standard keyboards, I have a hard time making mental shifts like that. But if I could get a 75% keyboard with a split spacebar and 1u keys on the bottom row… I would jump at that. I may have to build that myself at some point.

I have decided that building the Planck was a great experience and it is a fun conversation piece, but not something I would regularly use.

Mechanical Keyboards